E-Sharp News
December 2011
Often, the full potential of grinding wheels is not completely utilised. This may be due to a lack of systematic approach. The following describes one such systematic approach that may help to establish effective key parameters of grinding processes.
The methodology may be applied to conventional creep-feed grinding as well as the grinding of flutes of milling cutters and taps, using conventional or superabrasives.
The recommended approach is structured into six process steps. A few simple formulas are used to define some of the key parameters.
Process steps:
- Objective
- Preparation
- Run
- Evaluate
- Record
- Publish
Objective
First, be clear what you or others want to achieve. Some objectives may be in conflict with each other, such as aiming for higher removal rates while, at the same time, trying to achieve better process stability. Some of the objectives may be:
- Fixing an existing problem (burning, surface finish, dimensional stability)
- Better process economy such as longer wheel life
- High material removal rates, i.e. shorter cycle times
- New specification to be tested
- More reproducible results
Preparation
If the task is an existing process, make yourself familiar with the key issues and record them. These include:
- Material removal rate Q’w or Q-prime (remember Q’w = (vw x ae)/60 = (feed-rate vw in mm/min x depth of cut ae in mm, divided by 60)
- Wheel speed vc
- Feed-rate vw
- Total amount of grinding allowance and depth of cut ae and number of cuts
- Check nozzles for damage, establish and record nozzle position
- Measure coolant temperature (morning and evening) and check flow rates
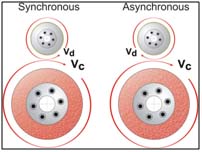
- Dressing parameters such as speed ratio qs, infeed, synchronous or asynchronous dress
- Check Amp meter during grinding cycle. Record highest reading during roughing
- Check air grinding time and length of overrun. Remember: actual grinding time is often only 20 to 30% of total cycle time. Gains in cycle time reduction can often be achieved by reducing air grinding rather than by increasing feed-rates.
Selection of Abrasives and Bond Systems
For creep-feed grinding, select a friable aluminium oxide (Al2O3) in a vitrified bond. For tap thread grinding, choose a mono-crystalline Al2O3. For flute grinding of taps with conventional abrasives, select a ceramic grain in resin bond. Carbide cutting tools require diamond wheels, preferably in hybrid bonds such as the NaxoForce series, or a high performance resin bond. Milling cutters made of tool steel require CBN, either in hybrid, vitrified or resin bond, in this order of preference. When choosing the grit size, select as large a grit size as possible, keeping in mind corner radii requirements and surface finish constraints. Remember that halving the grit size allows eight times more grits into the same volume, or four times more grits into the same contact area. This increases friction and reduces coolant transport.
Prior to running any cycles, also ask the operator about the main problems that have been encountered. These questions include:
- Does or did the wheel lose form?
- Did you experience burning or chatter?
- Is the process stable?
- How does the coolant supply behave? Is it the same over a full shift?
- Is the fixturing rigid? Do vibrations occur?
- Can you maintain dimensional stability?
Run
If using a vitrified bonded wheel, prior to mounting the wheel, ring it! Use plastic blotters between metal flange and vitrified grinding wheel. Tighten the flange screws with a torque wrench. Unless any other torque values are given, use 20 foot-pounds or about 30 Nm for induced porosity wheels. Superabrasive wheels with metal bodies do not require plastic flanges nor torque wrenches.
If you feel the existing parameters for a given wheel are reasonable, repeat those parameters with a new wheel specification and compare results.
Let’s assume you are running a vitrified wheel test and you have just a few hours available for the test, consider turning down the diameter of the test wheel, halfway between new wheel and the stub wheel diameter. Often, a new wheel gives excellent results while the performance diminishes as the diameter gets smaller. Remember 100 mm in diameter equals 314 mm in wheel circumference and hence much fewer abrasive grits have to share the same workload.
Dressing Parameters
Let’s assume that you are confronted with a new grinding task for which there is no historical data. If the process allows dressing the wheels on the machine with rotary diamond rolls, start with synchronous dressing, setting the speed ratio qd at 0.8, with a diamond roll infeed ad of 0.5 µm to 1 µm per revolution for conventional abrasives. If using CBN, reduce to infeed per revolution to 0.2 µm. The NaxosForce bond family also offers dressable diamond wheels.

Synchronous and asynchronous dressing
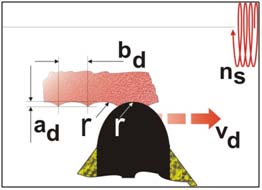
Form dressing rolls feature a defined radius that allows the dressing of profiles into grinding wheels by using two of the machine axes to generate the desired profile. In this case, the feed-rate vd should be selected such that an overlap ratio ud of 4 to 6 will result. The smaller the overlap ud, the more aggressive and free-cutting the grinding wheel will behave. The lateral feed-rate vd, the formula of which you will find at the end of this article, depends on the wheel RPM (ns) and the roll radius (r).

Feed-rate vd of a form dressing roll
Grinding Parameters
To establish the feed-rate vw, use the specific material rate Q’w (Q-prime) given in volume of material removed (mm3) per mm wheel width per second (mm3/mm/sec): Q’w = (feed-rate vw x depth of cut ae) / 60. The following values may help as a starting point
- Creep-feed grinding hardened steel: 5 to 10 mm/mm/s
- Creep-feed-grinding aerospace nickel alloys: 10 to 20 mm3/mm/s
- Flute grinding of taps with resin bonded wheels: 10 to 20 mm3/mm/s
- Flute grinding solid carbide mills: 6 to 12 mm3/mm/s
These values depend on the stiffness of the machine tool, the fixturing of the workpiece, the hardness and the microstructure of the material to be ground.
If possible, work in down-grinding mode as it generates lower forces that, in turn, reduce the risk of burning and flexing of the workpiece. Depending on the grinding task, the number of passes should be kept as low as possible. To reduce cycle time, it is better to reduce the number of passes than to increase feed-rates. However, if cycle time reduction is aimed for and one must choose between increasing the depth of cut or the feed-rate, it is better to increase the feed-rate as this makes the grinding wheel more aggressive and more free-cutting.
Evaluate
Before making too many changes to any given process, run it for a while, ideally through the full life of one grinding wheel if you are working with conventional abrasives.
Also, remember, good engineering is to change only one parameter at a time, observe changes, evaluate and only then make further adjustments.
Measure components for dimensional accuracy, burr formation and grinding abuse (burning). Given that you have knocked out any unnecessary passes, to further shorten cycle time increase the feed-rate. To reduce wheel consumption, reduce dress infeeds. For example, in continuous dress creep-feed reduce the infeed per revolution from 0.8 micron to 0.6 micron/rev. Ideally, push the wheel to breakdown or to burning. For this purpose, particularly burning, you may require some reject components.

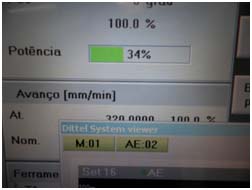
Load reading on a creep-feed grinding machine
If the Amp meter is reading 20% of maximum load you may increase the feed-rate by steps of 20% steps, if the Amp reading is at 60%, take 10% steps. Again, remember the aim is a stable process. We are not after results that look great initially but will fail by the next shift change. Once you have reached a limit, be it wheel break down or burning, back-off with feed-rates by 20% to reach the comfort zone of process stability.
What have you observed? How did the wheel behave? Loss of form indicates one or several of the following things:
- The wheel is too soft
- Surface speed is too low (increase by steps of 3 to 5 m/s)
- Feed-rates are too high
- Amount of dressing is insufficient
- The grit size is too coarse
Did the process result in burning?
Check whether the wheel is sharp after dressing. To do this, stop the wheel completely and feel it with your fingertips. If the wheel feels smooth, your dressing parameters need adjusting, or the wheel needs to be opened with a dressing stick if using superabrasives. Check coolant delivery. Is the nozzle in the right position? Does the coolant flow get cut off by the fixture? The surface speed may be too high. Hence, try to reduce wheel speed by 3 to 5 m/s. You may increase the feed-rate to increase self-sharpening of wheel. For this purpose, use 10% steps.
Record
Create your own spreadsheet, listing all the main parameters for each of the passes that are needed to grind a component. The parameters that need be recorded:
- Wheel speed vc
- Depth of cut ad
- Feed-rate vw
- Material rate Q’w
- Average chip thickness hm
- Aggressiveness of grinding wheel Fa
- Dress ratio qd and amount of dress ad
- Amp load in %
- Cycle time: tc
Publish
Share your results with your colleagues and build a database that will give you faster results next time you have to run a similar test.
By using a systematic approach as outlined, we can increase process stability and economics and will ensure that the full potential of modern grinding wheels is fully utilised.
Formulas & Abbreviations
| Fa (aggressiveness factor (20 to 30)) |
 |
| Q’w (Q-prime): |
 |
| hm (average chip thickness): |
 |
| vd (feed-rate of form dressing rolls) |
 |
| qd (speed ratio of dressing) |
 |
| qs (speed ratio of grinding) |
 |
- ad = depth of cut of dressing tools per pass or revolution in mm
- ae = depth of cut per pass in mm
- ds = grinding wheel diameter in mm
- ns = grinding wheel RPM
- qd = speed ratio between grinding wheel and dressing roll
- tc = cycle time in seconds
- ud = overlap ratio of form dressing rolls (4 to 8)
- vc = wheel surface speed in m/s
- vd = feed-rate of form dressing roll in mm/min
- VR = dressing roll surface speed in m/s
- vw = workpiece feed-rate in mm/min
Article supplied by Walter Graf, Chief Marketing Officer, Winterthur Technology Group 2011
10 December 2011